Capy 0.3 Release Notes
by Zen1th
Reminder: Capy is NOT ready for use in production as I’m still making breaking changes
Capy is a GUI framework for Zig made with performance, cross-compilation and native widgets in mind. The goal is to be able to seamlessly cross-compile from any platform to any other one. This includes Windows, Linux, WebAssembly, and soon will include macOS, Android and iOS.
It’s been 6 months since the 0.2 update, but Capy is getting forward at its own slow pace.
Improved the build process
The build process has been simplified as much as possible.
The 50-line install() function you had to copy has been removed. So has the requirement to supply the path where Capy has been installed. Alongside that, a template has been added which allows to get started with Capy much faster than before.
In practice this means you can do that:
// Usual build functions..
const exe = b.addExecutable("my-gui-app", "src/main.zig");
exe.setTarget(target);
exe.setBuildMode(mode);

// one-liner for using Capy
try deps.imports.capy.install(exe, .{});

// Usual build functions..
exe.install();
New components
I experimented with using Zig’s comptime abilities so that one method could be used to
get, set, and bind a property like if we were in a dynamic language.
This allows to switch from setText("Hello, World") to set("text", "Hello, World").
I’m still wondering if this is better and whether setProperty would be a better name for it,
but this atleast removes the burden of having to create 3 functions each time you add a property
to a component.
- Added
enabledproperty to Button - Added
CheckBoxcomponent - Added
Aligncomponent.
It’s aim is to replace the former alignX and alignY properties which
were a confusing bit of API design. Adding Align made the API should now be clearer and easier to understand,
while also simplyfing the implementation of layouting.
Button(.{ .alignX = 0.5 })
becomes
Align(.{ .x = 0.5 }, Button(.{}))
- Added an experimental for-each component (
ColumnList). You can see it used in the hacker-news example but it is currently highly experimental. - Added ScrollView, which allows to make any component scrollable
Wrapping containers
Added wrapping property, this allows the elements to wrap instead of going off to infinity.
capy.Row(.{ .wrapping = true, .spacing = 5 }, .{
	capy.Button(.{ .label = "Button #0" }),
	capy.Button(.{ .label = "Button #1" }),
	capy.Button(.{ .label = "Button #2" }),
	capy.Button(.{ .label = "Button #3" }),
	// ...
})
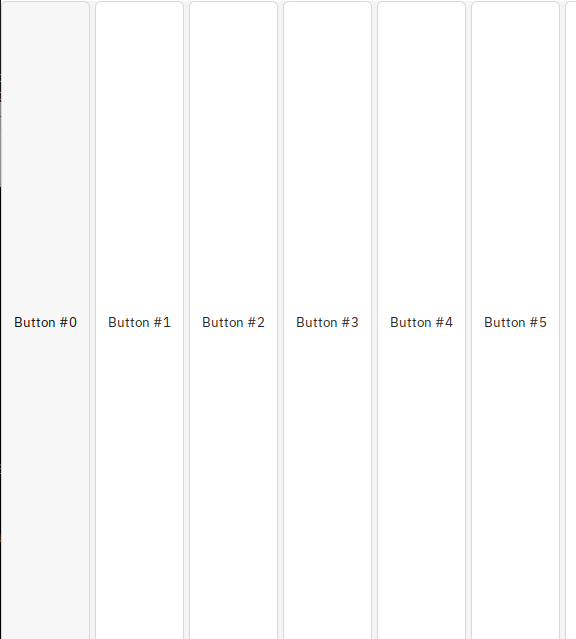
Here’s a row with wrapping set to false, aka old behaviour:
And here is it with wrapping set to true: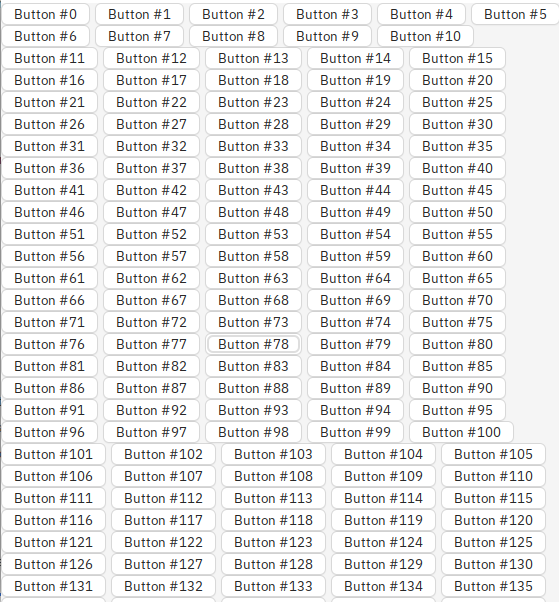
Notice how with wrapping set to false (equivalent to the old behaviour) components take all the height of the Row, because the Row is only laying them out horizontally, so it gives them all the vertical space.
However, with wrapping set to true, components may wrap over to bottom which means that Row is laying them out horizontally and vertically, so it gives components their preferred size instead.
Hence, in both pictures, the buttons have the same width.
Optimized DataWrapper
DataWrapper is what is responsible of giving data binding, animations and other neat things to Capy. It’s usually used whenever a property is required. This means that it’s often used through the entire codebase and can end up in components that might be instantiated hundreds of times. Under this, it’s logical to try to reduce the size overhead it gives.
Thus, the data structures of DataWrapper were optimized for size, this resulted in
the overhead being reduced, from 152 bytes down to 128 bytes.
On the other hand, thedependOn function was added to DataWrapper. It’s meant for values that depend on other values, while avoiding having to manually setup tons of change listeners. This can be used for things like a ‘Submit’ button, which can dependOn all fields being valid. You can quickly see how it can be used in the flight booker example
Optional values can also now be animated using animate(...)
win32 fixes
The native integration for High-DPI was added and is now functional. The only step remaining is to correctly
implement the actual pixel scaling. When it’s done, there won’t be any change necessary on the
application side as Window.source_dpi is already used well for that.
Among that, there were a lot of bug fixes.
- The background is now correctly cleared on resize (c32e0e1)
- Improved performance and fixed flickering (352a959)
- You can now use
std.login Debug builds (aed5e0f) - Caption font is now used, this replaces win32’s default GUI font that came from Windows 95 (9bb59a1)
First steps on Android
Recently, the first progress towards an Android backend were made.
The Android backend is something I couldn’t have managed to do without the efforts the Zig community put in ZigAndroidTemplate, so thanks to them.
Secondly, Android is absolutely not made for native code that creates native views. But JNI truly can let you do anything Java can.
Currently, it only supports TextField, Button, Canvas and Container.
For more information, see the blog post detailing the port.
Baby steps on macOS
As always, for macOS, I’m aiming at being able to build your app from Windows/Linux/macOS to macOS.
So far, the plan is to download the macOS SDK automatically in build.zig, which is something you can do
as long as you accept the EULA. However this has not
been done yet.
Currently, what has been done is that, if you have a macOS SDK in the macos-sdk folder, you can build a basic non-functioning app. It doesn’t work, but it calls the NSWindow APIs! We’re onto a first step!
A note about the WebAssembly backend
More functions were implemented on the WebAssembly, this quite notably allowed to run the OpenStreetMap viewer example online, without any platform-specific code.

However, since Capy upgraded to the new Zig self-hosted compiler and it still hasn’t yet reimplemented async, the backend is currently unusable due to this compiler regression.
- Add viewport meta tag to run on mobile devices (68dfda0)
Lastly, an experimental HTTP module had been added (03993dd) that used the Fetch API on WebAssembly.
On desktop, it used zfetch but when it was archived by its
creator, I had to switch to another library. Sadly no library was as simple to build as zfetch
(that is where a simple zig build run is enough to setup everything quick enough and on all major
platforms).
I’m currently counting on Zig’s efforts to implement a TLS library and an HTTP client in the standard library. I’ll be able to switch once the changes brought in #13980 are stabilized.
Documentation
The documentation for Capy has switched from GitHub Wiki to a Docusaurus instance. It’s still editable by the public on the capy-ui/documentation repository.